He hecho este jabón para el SoapChallenge Club de septiembre, haciendo la base para fundir según el
magnífico tutorial de Aruna Padmanabhan, y después elaborando el
diseño con las técnicas mas o menos tradicionales del jabón de
glicerina o melt&pour.
Lo más difícil de este reto ha sido
trabajar contrarreloj. La mitad del tiempo que había para el reto
estuvimos de vacaciones, y el resto, con cierto caos vital que
incluye mudanza de un hijo, reformas, peleas con la Administración y
demás asuntos típicos de principio de temporada, con lo que solo he
contado con 24 horas y materiales escasos para hacer el jabón, la
presentación y esta publicación del blog. O el jabón salía a la
primera o no podría participar.
Mis ingredientes/ My ingredients
Mi primer paso ha sido elaborar la
base. Me ha parecido muy sencillo seguir los pasos del tutorial del
Soap Challenge Club. Al enmoldarlo, tenía mis dudas, por la capa
blanquecina que se formó en la superficie, pero una vez eliminada
¡Eureka!. Como podéis ver en la fotos, la transparencia es
espectacular. Me encanta y me ha parecido muy fácil de hacer.

El bloque y dos pastillas de 3 cm / the block and two bars 3 cm wide
El siguiente paso, diseñar el jabón.
Necesitaba algo simple pero resultón. Me he acordado de unos moldes
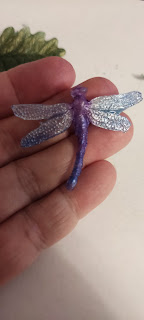
de silicona caseros con libélulas, que hice hace bastantes años utilizando un pequeño adorno de Navidad y que me han parecido muy
adecuados para este jabón transparente. Una vez decidida a usar las
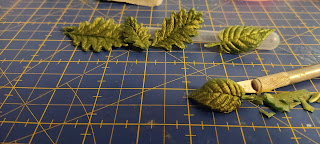
libélulas, el resto del jabón me vino solo a la cabeza. Para las hojas he usado un molde de
repostería. Después lo he pegado todo con jabón transparente
recién fundido.
Espero que os guste el resultado. Para mi ha sido muy divertido hacerlo, pese a las prisas. A continuación tenéis algunas fotos del proceso.
Nota: Como soy muy torpe, en algún momento deshabilité los comentarios del blog, y he sido incapaz de activarlos de nuevo, así que si quieres dejar algún comentario, puedes hacerlo en mi publicación de Instagram
________________________________________________________
I made this soap for the September Soap Challenge Club, making the transparent base according to the great tutorial by Aruna Padmanabhan, and designing the final soap with traditional melt & pour techniques
The most difficult part of this challenge was racing against the clock. Half of the challenge time we were travelling on vacation, and later, we were living in a kind o chaos, which includes my son´s moving stuff , home renovations, and other return-from-hollidays typical issues. So, I had only 24 hours to make the soap and triying to obtain all the ingredients before the deathline. I had only one attempt, or I wouldn't be able to participate.
My first step was making the base. I found very easy to follow the steps of the Soap Challenge Club tutorial. I used coco glucosyde instead of betaine. When I was molding it, I wasn´t very sure of the result, because of the white layer on the surface, but once it was removed, Eureka !. As you can see in the photos, transparency was amazing. I love it!
The next step was designing the final soap. I needed something simple but cool. I have some dragonflies silicone molds I made years ago using a small Christmas ornament and which I found very suitable for this transparent soap. Once I decided to use the dragonflies, I just imagined a soap that match them.
For the leaves I used a pastry mold. Then I glued everything with more melted transparent soap.
I wish you like the result. It has been a lot of fun for me, despite the rush.
NOTE: somehow I have disabled the comments and now I am incapable for turn them on again, so if you want to comment or leave a feedback, you can do it in my Instagram entry

La capa superficial blanquecina retirada, y los moldes de libélulas y hojas/ Removed white top, and tiny fireflies and leaves molds
Una pizca de colorante líquido/A little drop of blue
Vertido en el molde. Luego lo corté en tres rodajas/Poured into the mold. Later I cut it into three round bars
Jabón transparente con mica verde/Transparent soap with green mica
Vamos a pintar!/Let´s do a little painting!
Rematando rebabas/trimming edges Ni tan mal / Cool! Isn´t it?


